Il tutto nasce dalla curiosità di capire la diffidenza, nei confronti di queste tecniche, tra ripresa ed elaborazione.
Spesso ho sentito parlare di artefatti generati dall’elaborazione come motivazione della non attendibilità di queste riprese.
A questo punto ho tutti i dati per poter eseguire un confronto di tecniche differenti che dovrebbero evidenziare questi difetti nefasti.
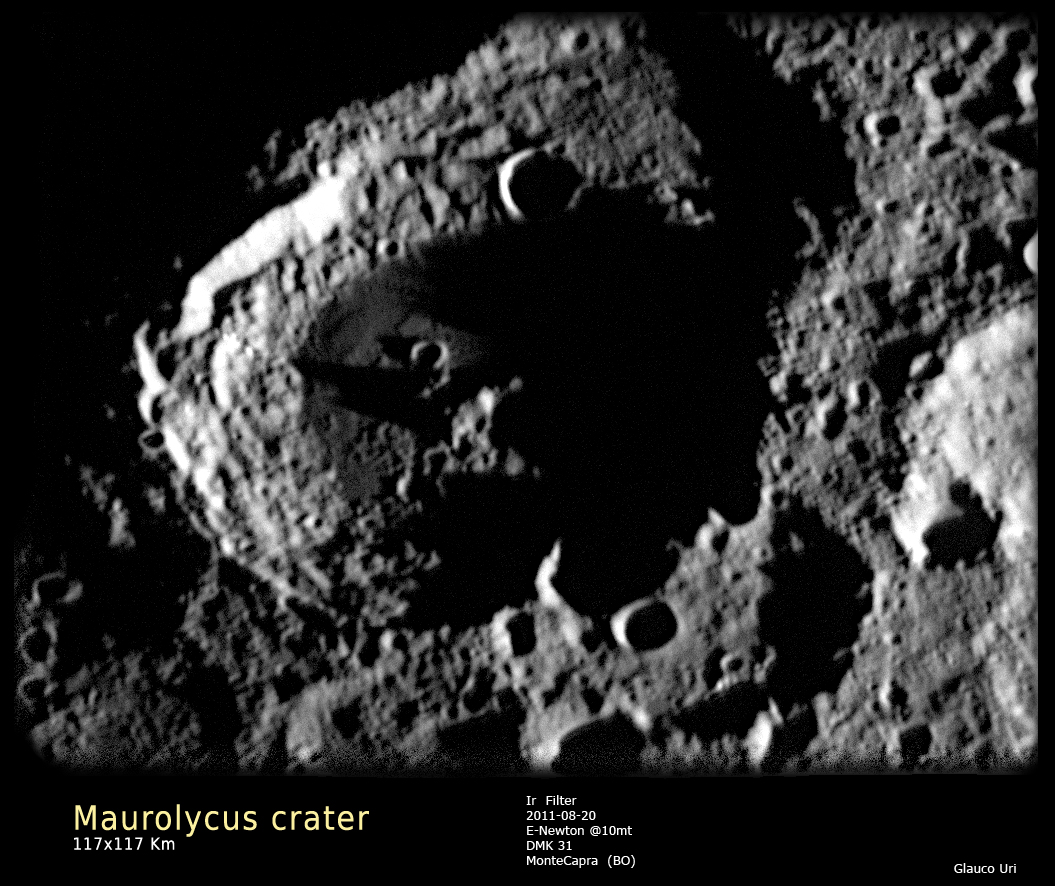
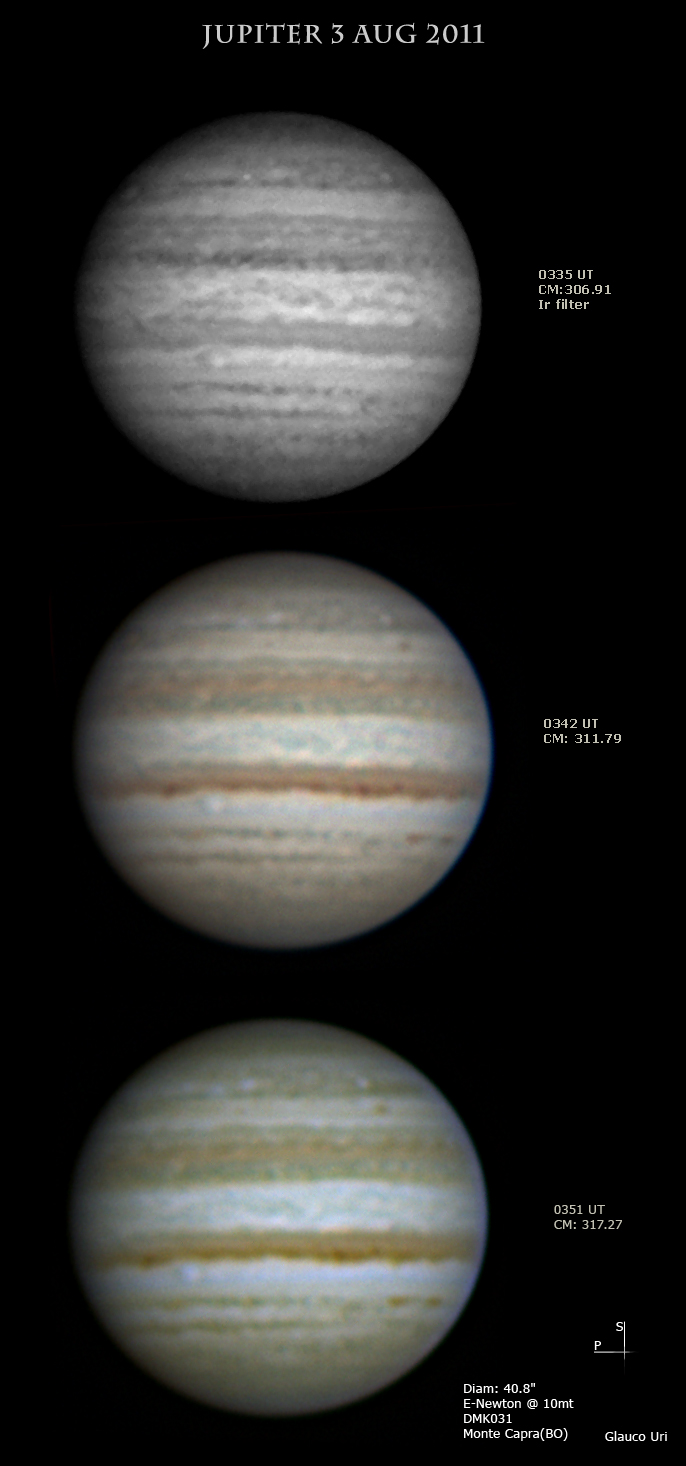
Di seguito riporto i ritagli di 250×70 delle immagini ricevute su Giove, della EB.
Osservando ripetutamente questa tabella, non mi pare di riscontrare differenze sostanziali nei contenuti, ne artefatti.
Chi più, chi meno, ha evidenziato con l’elaborazione, caratteristiche come la saturazione dei colori,
dettagli fini, medi, oppure grandi contrasti di colore .
Un confronto diretto cosi immediato permette di evidenziare, qualora ce ne fossero, artefatti introdotti
durante questa personalizzazione degli autori.
Questi filmati di elevata qualità, hanno spinto un po tutti a forzare poco
la mano, pertanto il processing, ha evidenziato quello che le camere sono state in grado di immagazzinare,
generando a mio avviso nessun artefatto misurabile.
La forma del pennacchio centrale, è mantenuta anche se le proporzioni sono lggermente differenti e i terminatori piu o meno evidenti, ad esempio.
Obbligatoriamente va fatta una considerazione per una affermazione del genere: I filmati di partenza sono di ottima qualità.
Passando al lato dell’osservatore della Bacheca, questo, inevitabilmente esprime una preferenza data dalle
precedenti esperienze di elaborazione, semplice bellezza fine a se stessa oppure dal confronto con le
immagini immagazzinate nella mente durante numerose osservazioni notturne.
A questo punto nasce la “preferenza”, la decisione che una foto sia più bella di un’altra, ma pure qua bisogna tenere conto
dei parametri che vengono utilizzati per la valutazione.
Il visualista, tenterà di apprezzare maggiormente l’elaborazione meno satura di colori e meno contrastata,
mentre l’osservatore casuale sarà piu portato verso una immagine più colorata.
Questo non può essere usato come metro elaborativo, ma è bene avere per lo meno
una idea del risultato che si vuole ottenere PRIMA di cominciare ad elaborare.
Altro discorso invece sono i dettagli registrati…. e qua il gioco si fa veramente duro.
La strada per migliorare i propri risultati in termini di dettagli registrati, è sicuramente quella dell’ottimizzazione
dello strumento, e qua non ci piove, che unita alla costanza (che genera esperienza) permette in quelle sere
con seeing benevolo di ottenere buoni filmati, che come abbiamo visto non tendono a generare artefatti.
Purtroppo non si arriva a questi risultati fin da subito, e capita sovente, di avere dei sorgenti decisamente
privi di dettagli, portandoci magari a “sovraelaborare”.
Su una cosa sono certo… se l’informazione non c’è, non si tira fuori manco a pagare oro!
In questi casi credo sia sufficiente accontentarsi.
Intestardirsi con l’elaborazione serve solo per imparare a conoscere i software, ma solitamente, l’immagine risultante
manca sempre di qualcosa.
Dimenticavo… un pizzico di fortuna non guasta mai …
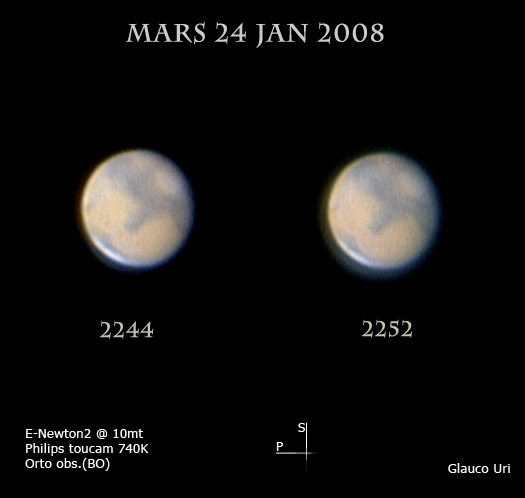
Arrivato sul posto, forse un po tardi, una leggera brezza mattutina causava un mediocre seeing, in ogni modo qualche dettaglio è venuto fuori. Riprese in concomitanza dell’alba con letture di fondo cielo a oltre 80 adu
Il risultato purtroppo non è un gran che, ma la serata meritava di essere quantomeno ricordata.
Arrivo su, monto, manca un cavo, scendo prendo il cavo, ok il cavo è a posto… batteria del telecomando scarica… (ho cominciato a pensare fosse una candid camera) torno a casa recupero una batteria torno su. ok ora funzia tutto, si alza il vento arrivano le nuvole…
Per sicurezza io l’ho detto … “sorridi sei su candid camera”
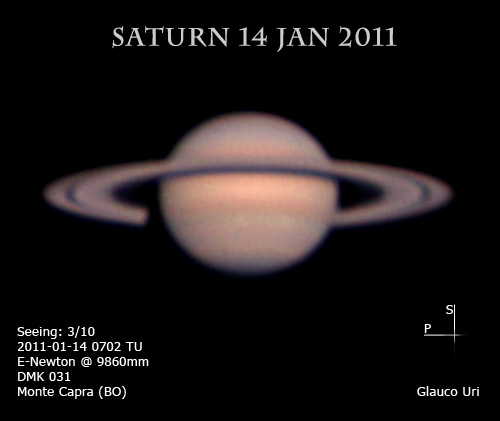
Serata motlo interessante , seeing assolutamente sopra la media.
All’oculare si è presentato subito molto stabile, divisione di cassini stabile e molto definita.
L’anello C ben visibile e per la prima volta sono riuscito a scorgere “bene” il disco del pianeta sottostante. Nessun colore straordinario sul disco, probabilmente la foschia ha attenuato le sfumature ; netta la nEB e quasi verdognola la calotta, la nPR e nPC.
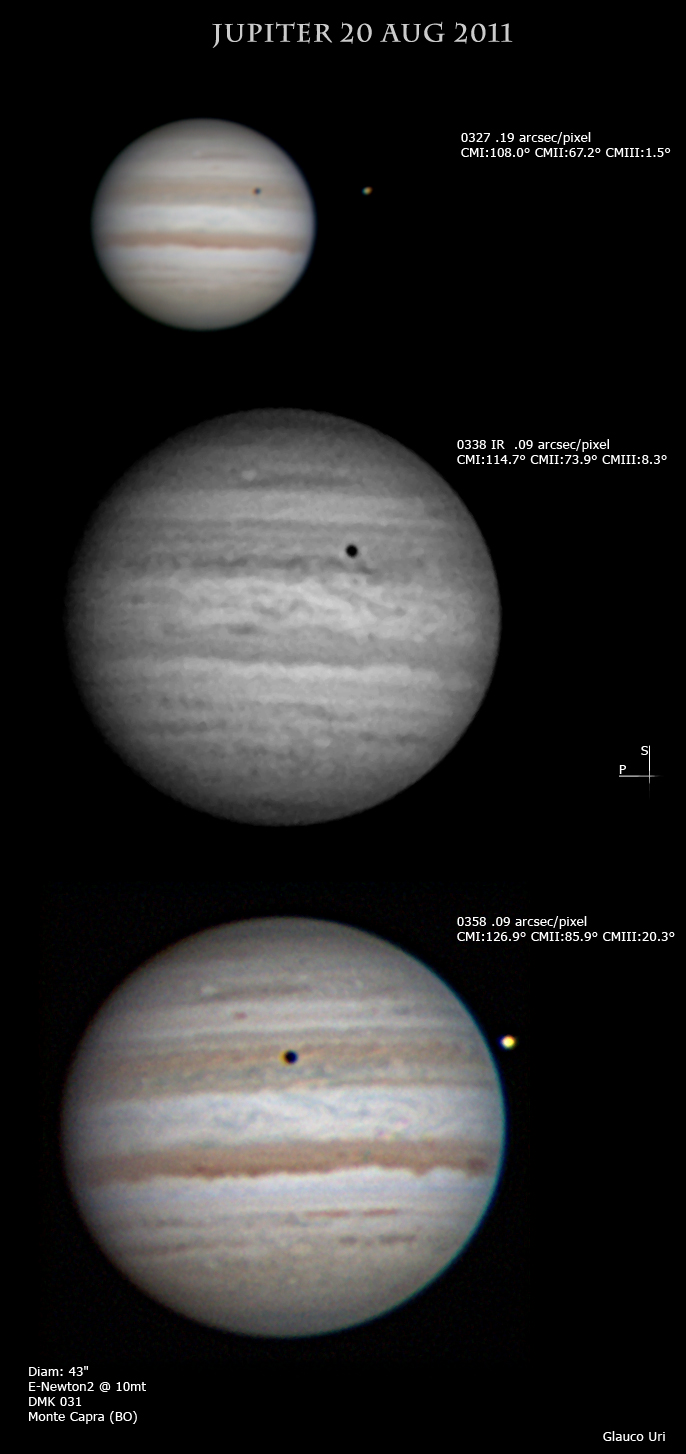
I dettagli sul pianeta invece sono molto interessanti, la tempesta la fa da padrona, inizialmente sembra una WOS molto ben definita chiara all’altezza della nTZ, lavorandoci un po su (fino a 600x PAN15+PM5X) ho definito una forma triangolare con la punta in senso opposto alla rotazione.
Durante l’elaborazione, in particolar modo nel fotogramma delle 0141 nell’anello B risalta una irregolarità.
Lo stesso giorno è arrivata in modo autonomo la segnalazione dal grande Cristian Fattinnanzi con lo stesso fenomeno.
Montando in sequenza i 4 fotogrammi è piuttosto evidente come la macchia si muova nel tempo.
Da una breve analisi sembra in effetti che il tempo di rotazione dell’irregolarità sia compatibile con la rotazione del pianeta che dovrebbe essere poco più di 10 ore.
Osservando in sequenza i 4 frames (2 IR e 2 R) si nota meglio l’irregolarità presente sugli anelli.
Anche Marco Guidi ha ripreso la stessa sera, nell’animazione seguente sono montati tutti i fotogrammi, dalle 23:35 alle 01:22 (107 minuti di rotazione) per circa 1/8 di rotazione. Considerando la grande incertezza della misurazione i dati sono compatibili. E’ assai improbabile che tutti e tre abbiamo generato un artefatto, inoltre l’irrregolarità si muove piuttosto regolare del tempo. Probabilmente siamo riusciti a riprendere uno spokes
Le foto pubblicate comprendono materiale di Cristian Fattinnanzi e Marco Guidi.
Tutte le immagini non mie sono dei rispettivi proprietari,
ogni utilizzo deve essere autorizzato dagli stessi.
Ringrazio anche Maurizio per il supporto teconologico. In bocca al lupo!!
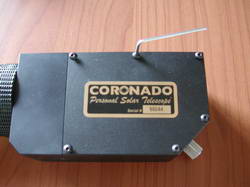
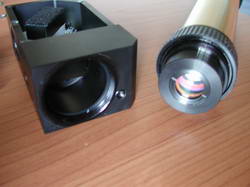
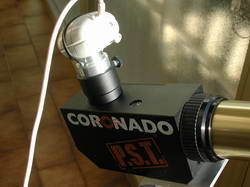
It incorporates in a single system a 40mm f/10 refractor and a system of filters for solar observation.
I bought it used in 2004, my model was bought in Anacortes in October 2003.
Put it simply, this model it’s neither professional nor exceptional (if not from the quality/price perspective), but it gives great satisfaction, especially when we take its usability into consideration.
I personally keep it inside permanently mounted on the alta-azimuthal head of my Manfrotto tripod, with Swarowsky ocular zoom 7-24 (in the photo); I believe this is the optimal configuration. This choice allows me to have a quick look at the sky in the morning before going to work since it’s always operational.
Personally I never had previous experiences of continuous solar observation, and as such, maybe naively, I was struck by the rapid changes that happen on our star, making it thus ever interesting to observe.
The observation through this instrument it’s not simple because the BF filter, immediately before the eye-piece (oculare), it’s only a few millimeters, reducing thus the usable field-of-view.
This means that the “out of axes” of the eye relative to the eye-piece it’s limited and it’s more relevant in eye-piece with wide field-of-view.
This instrument it’s definitely non conventional and it adopts clever and innovative ideas.
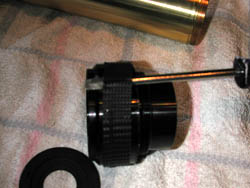
With a hex wrench let’s start our surgical intervention…
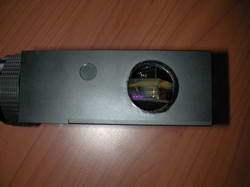
One of the first things that comes to the attention is the focusing element , this is inside the “maxic-box”, and it works by translating the prism, that works as a diagonal piece, along the bisecting axes between the primary lens and the eye-piece (shown in figure by a white arrow).
To allow the prism to move, on one side there is a sort of track built into the box that constrains its position and to prevent it from getting out of its site when it’s pressed by the door when it’s being closed; to allow it to translate on the side shown in figure a glued-on velcro is used as a bearing.This system allows for a very economical focusing element with the only defect of producing a prism a little bit… elongated.
All considered the results is remarkable given that a spring always in compression/tension takes care of undesirable play on the regulation screw and a good dose of grease make the system pleasantly smooth.
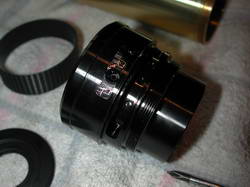
The other novelty is the solar-finder (cercatore solare), based on the principle of the stenopeic hole, also inside the “maxic-box”, as it is shown in figure. It projects an image on a opaque glass mounted on the top of the instrument (in the drawing, following the yellow line, the sun comes from the left and it is then deflected on the opaque glass on the top). This is a really clever idea, how many times have I blinded myself trying to find the sun, … I knew that it was there and easy to see … but not so much to center on it as I thought.
We are finally arrived at the heart of the PST that is the interferential filter Fabry-Perot Etalon. The PST can tune the filter by the rotation of the “tilting” element, an aluminum grid covered in textured rubber. This way it is possible to tune the filter on the “correct” frequency, and mechanically the effect is that of translating one of the two filter components, and to compress or relax the orange elastic seal in between the two filters.
My model, right from the moment I purchased it, suffered from a mounting problem, since the correct tuning would happen at the end of the range, not allowing me to set it up as wished.
Taking it apart, I realized that the external grid, that covered with the textured rubber, acts upon the aluminum grid of the tilting element through a 2mm screw that can be positioned in any of the 12 threaded holes positioned like the hours in a watch.
It is then simple to better regulate proceeding in the following manner:
First, observing the sun, one should move the tilting in the best position that’s allowed by the instrument.
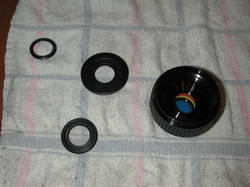
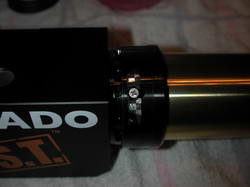
Then, unscrew the etalon filter from both sides.
Slide-out the rubber element as shown in figure. For example, using a screwdriver it is possible to delicately slide the rubber ring by rotating it.
Remove the silver coated tag (now you are a real hacker!)
Unscrew the 2mm screw with an appropriate Philips screwdriver
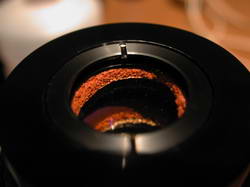
At this point the grid is free and can be lightly moved to see where in the range it is, and by rotating it a couple of holes a better position can be chosen.
In the eye-piece holder of the PST it is also inserted the BF that has the role of blocking the harmonics generated by the etalon filter and all of the other one that have no purpose to our use, such as the infrared..
The focusing on the PST is designed for visual observation, allowing it to be coupled with an eye-piece or a Barlow + eye-piece. I don’t consider the eye-piece holder to be the focusing element, since the focusing works as previously explained. The eye-piece holder actually consists of two parts. The first is simply a male-female aluminum connector used to set the final filter at the correct distance; the second incorporates the BF filter, and the nylon knob used to fix the eye-piece..
Since the threads are the same, the first element can be removed allowing thus to focus also on elements such as WebCam or cameras with deeper body.
Visually the PST is capable of good observations of protuberances, filaments, solar spots, and everything that is reasonably large for a 40mm pupil.
It is reasonable to use 80x zooms. Pushing to 100x efforts is more than the benefit.
My advice is to stick to 40-60x (not for anything they provide a magnificent 12.5mm Kellner, what happened to mine???).
I’usually put on it a Panoptic 15mm and a Nagler 9mm, is pretty to see this over it it has the same size of the scope.
To conclude, this is an extremely compact and transportable instrument, mechanically well designed, even if not so well mounted (maybe this is way there are so many around with out-of-phase tilting), well designed for an almost-daily use, light, and not to underestimate, safe for our eyes or for those of a curious kid or somebody less expert..
As a negative, it is hard to use with Wide Field of View eye-pieces, it is not possible to record with it (but a solution was given previously), and it is not possible to reuse its parts; let’s keep in mind that, as it is, the only option is to add the solarmax 40mm in front of the principle lens to briong it to a barndwidth inferior to .6Å.
Another doleful note, found on my model, is that tuning the tilting does not regulate the entire field uniformly; the tuning area only covers a range about 1/3 of the eye-piece field of view, and it is inclined about 45° relative to the axis. This makes impossible a perfectly homogeneous field of view.
If for example, with the sun covering 80% of the field-of-view, I tune on a large protuberance on the top right and then move the telescope such as the protuberance is now on the bottom left, it will not be tuned and this is quite annoying.